Josh Sommers
Josh Sommers is a Software Engineer, Graphic Designer, amateur digital
photographer and musician from Petaluma, Northern California. Josh began
using computers to create artwork at the age of 12 in the early 1990's,
starting with Photoshop version 2. His enthusiasm for computers and digital
art continued to grow throughout high school, and upon graduation he was
selected to receive a full tuition scholarship to DeVry University in
Southern California. He graduated from DeVry magna cum laude in 2001 with a
degree in Computer Information Systems. He pursued a career in software
design and within a year earned a position as the lead applications
developer for a billing software firm in Northern California. At the same
time he became interested in digital photography. Since 2001 he has focused
primarily on his artwork and experimental photography including panoramic
photography, conformal mappings, and high dynamic range photography. You can
see his broad range of artwork and photography online at
www.flickr.com/photos/joshsommers.
Technical Details
Equipment used:
- Full Size Tripod
- Nodal Ninja 3 Panoramic Tripod Head
- Canon Digital Rebel XTi
- Canon 10-22mm Super Wide Angle Lens
Capturing Technique
To create the base equirectangular image I find it is best to shoot in High
Dynamic Range. This allows me to prevent strong over exposure near the sun
or any other light source, and underexposure in the shadows. I shoot using
my camera's auto-bracketing mode set to -2, 0 , +2 exposure value, and I set
this range on an area of the scene with average exposure. I take three shots
at each of 17 camera positions with the camera in portrait orientation: One
row of eight positions (at 45 degree intervals) pointed 45 degrees upwards,
one row of eight positions pointed 30 degrees downwards and one shot,
handheld at arms length pointed directly down for the nadir shot. This
approach enables me to leave out the zenith shot, which in general is the
hardest shot to stitch.
Stitching Technique
I use Autopano, Hugin and Enblend to stitch my base equirectangular image.
Because I shoot in HDR, the final panorama is actually comprised of three
panoramas: one for each exposure value. Before I begin the stitching process
it is necessary to group the differently exposed images into individual
folders- one for the under exposed images, one for the standard exposures
and one for the over exposed images. It is also necessary to name the images
from each camera position for each exposure value the same (ex. The first
camera position image for each exposure value would be named img(1).jpg).
I begin by stitching the overexposed image set. I load the images into Hugin
and then use Autopano to auto generate control points. Then using Hugin I
remove bad control points and create additional control points to better
align the images. When the images are sufficiently aligned I render the
panorama into a blended single layer TIFF file using Enblend. To produce the
remaining two panoramas, I simply copy the Hugin project file into the
standard and underexposed directories. This causes Hugin to load the same
control points for the standard and under exposed image sets. Again, Enblend
is used to render the final high quality TIFF file.
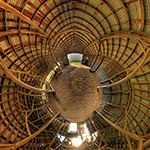
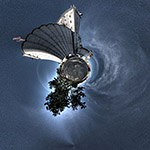
Once I have all three panoramas stitched and rendered, the next step is to
create the HDR image and perform tone-mapping. This is done using
Photomatix. The resulting HDR image is then loaded into Hugin to produce the
stereographic projection. In this stage an infinite number of views can be
produced from the same equirectangular panorama, and is the most creative
stage of the process.
|

|